This is a short tutorial on how to add users to your Meta Business Manager and how to accept the email. We will also cover the most common errors at the bottom of this post.
Step 1: Log into your Meta Business Manager:
Click here to go to Meta Business Manager,. If you have multiple accounts, you must first select the correct account. If you are already logged in, ensure you are in the correct account by clicking the dropdown menu in the top left corner.
STEP 2: Adding People

In the navigation window on the left, locate ‘Users’ in the dropdown menu (you may need to click to expand the options). To add one or multiple people, click on ‘People,’ and then proceed by clicking the blue ‘Invite People’ button.
Step 3: Add an Email Address:

A pop-up window will appear where you need to input an email address. This email address doesn’t have to be associated with Meta, but the user must have access to this email and needs to be able to log into their personal Facebook account. (Later in this post, we will cover the steps the user needs to take with this email to gain access.) If you are giving the same access type to multiple people, you can add multiple emails in this field. Once you have filled in the email address(es), click ‘Next.
Step 4: Select Access

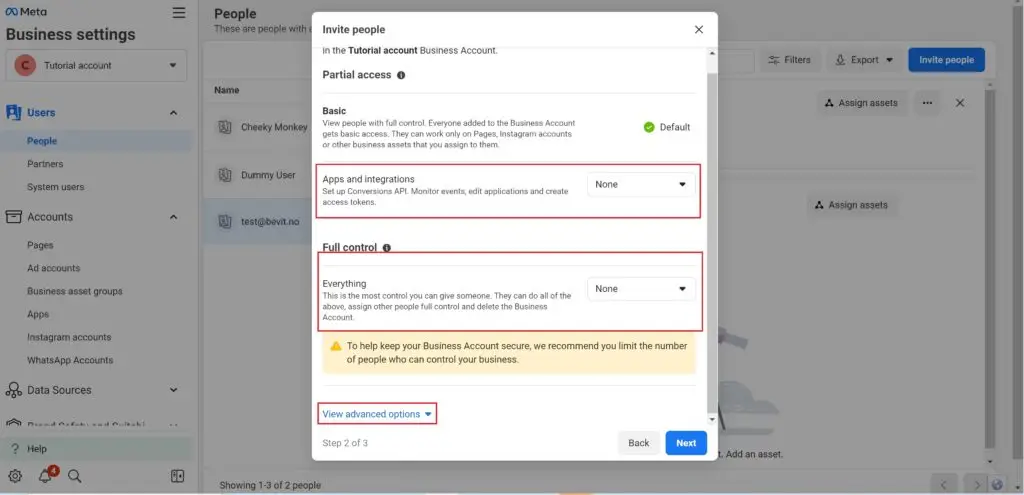
In the first access window, choose the access level you wish to share. You can opt for Partial access, including apps and integrations, or grant full control. Under advanced options, you can also provide access to finances in the Meta business account. Note that Admin access is required for assistance with pixel installations, etc.
Step 5: Assign Access

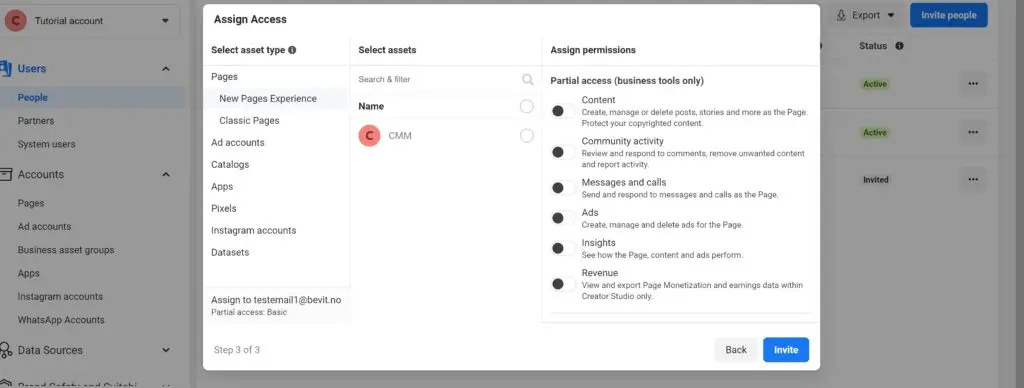
In the next window, you can designate access to different assets. On the left side, choose where to find the asset; in the middle, select the asset; and on the right, specify the level of access to share. Keep in mind that if you’ve granted admin access, the user will have the ability to select assets and determine access levels themselves.
How to Accept the Invite:
The user will receive an email from Meta. Open the email and click “Get Started.” Follow the simple steps, adding a name as prompted. The last step may take a minute to load, so please be patient.
Make sure that the user is logged in or can log into their personal Facebook account in the browser.
Common Issues:
I am unable to add/invite people to my Meta Business Manager
f the blue ‘Invite’ button is greyed out, you may not have permission to add people, or your account might be restricted. In such cases, visit the business support page. where any restrictions will be listed. You can request a review to lift these restrictions.
I Added the Wrong Email Address:
Navigate to ‘Users -> People’ and click the three dots next to the person. From there, cancel the invite and start over again.
I am not able to add in an email:
If nothing happens, ensure that pop-up windows are enabled in your browser.
I am unable to accept the invitation.
This issue may arise due to personal restrictions or the need for two-step verification. If neither of these is the case, I recommend attempting to accept the invite using a different browser.
Can’t Assign Access After Invitation Has Been Accepted.
The initial access might not allow the selected permissions. To rectify this, go to ‘User -> People’ and click the three dots next to the user. You will then have the option to edit the account permissions. If this isn’t available, consider removing the user and adding them again with the correct permissions. Personal account restrictions could also be the issue.
User Can’t Find the Invitation Email/How Can I Resend the invite?
First, check the spam folder. If the invitation isn’t there either, navigate to ‘Users -> People’ and click the three dots next to the person. Choose ‘Resend Invite’ to ensure they receive the invitation.


